This took me way too long, most of a day to get working… I had to replace my expired Wildcard certificate and I remember it being complicated, but forgot how I did it so it took me a while.
To get started, you may wish to view my guide on Purchasing a Wildcard SSL/TLS Certificate. Once you have your Wildcard SSL/TLS Certificate, you can follow this guide.
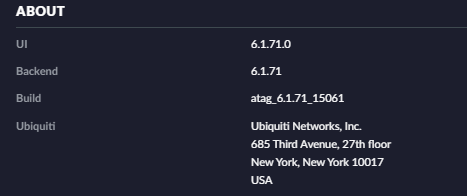
My Environment
- Unifi Cloud Key
- UI 6.1.71.0
- Backend 6.1.71
Resources
I followed a few guides when setting this up.
- This is the one that eventually worked for me.
- This one and
- This one may also be helpful, depending and your environment.
Preparation
You will need the following:
- SSH root access to your Unifi Cloud Key. I used Mremote as the SSH client.
- WinSCP access helps for copying files to the Unifi Cloud Key.
- Your Private Key from your Public/Private Key Pair. It should have the file extension of .key and when opened in a text editor, should look like the following:
-----BEGIN PRIVATE KEY-----
<base 64 encoded private key>
-----END PRIVATE KEY-----
- Your Full Certificate Chain file. This is the full chain of certificates, starting with your certificate, then any certificate authorities in the order described below:
-----BEGIN CERTIFICATE-----
<base 64 encoded certificate>
-----END CERTIFICATE-----
-----BEGIN CERTIFICATE-----
<base 64 encoded intermediate certificate authority's certificate>
-----END CERTIFICATE-----
-----BEGIN CERTIFICATE-----
<base 64 encoded root certificate authority's certificate>
-----END CERTIFICATE-----
NOTE: I actually don’t know if the order of the above certificates matter. I think I actually did the other way around but I can’t be bothered to test this at the moment.
- Each of these files are in PEM format, which is just a Base64 encoded binary file so that they can be read as text files. Decoding these files will result in mainly non-printable characters. For more info have a read about Privacy-Enhanced Mail.
- OpenSSL. You can install it on Windows, or use Git Bash or a Linux system with OpenSSL.
Installation
- Create a PKCS #12 bundled certificate archive. This includes your certificate, any intermediate CA and root CA certificates, and the private key.

'C:\Program Files\OpenSSL\openssl.exe' pkcs12 -export -in .\cloudkey.crt -inkey .\cloudkey.key -out .\cloudkey.p12 -name unifi
NOTE: This assumes that you’re in the current directory with the Private Key and Full Certificate Chain file, and they are named cloudkey.key and cloudkey.crt respectively.
- You will be asked to input an Export Password. Use whatever you like and note it down.
- A file called cloudkey.p12 will be created. Copy this file to the Unifi Cloud Key into the /home/ directory. I used WinSCP for this.
- Log into the Unifi Cloud Key as root using SSH.
- Stop services
service nginx stop service unifi stop - Remove the existing keystore (or rename it so you have a backup of it)
rm /usr/lib/unifi/data/keystore - Make a backup of the file /etc/default/unifi and then edit it:
vi /etc/default/unifiRemove the line “UNIFI_SSL_KEYSTORE=/etc/ssl/private/unifi.keystore.jks“
- Bring your new certificate and key into the keystore:
sudo keytool -importkeystore -deststorepass aircontrolenterprise -destkeypass aircontrolenterprise -destkeystore /usr/lib/unifi/data/keystore -srckeystore /home/cloudkey.p12 -srcstoretype PKCS12 -srcstorepass temppass -alias unifi -nopromptNOTE: Where it says ‘tempass’, that is whichever password you chose when as the Export Password in step 2.
- Start the services we stopped earlier:
service nginx start service unifi start - Remove the cloudkey.p12 file from /home/.
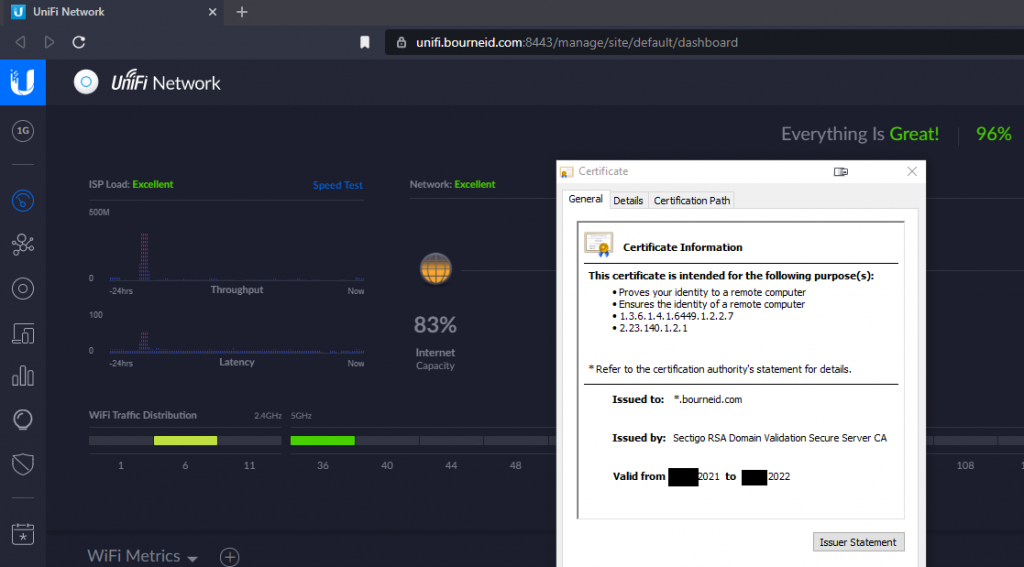
- Test by navigating to the fully qualified domain name. This relies on a DNS entry somewhere. I have a record in my internal DNS server that maps the IP address of the Unifi Cloud Key to unifi.bourneid.com.