Introduction
This guide describes how to install your own Wildcard TLS/SSL Certificate on Pihole running in a Docker container on a Synology NAS so that you can access the Pihole web interface with your own custom domain and with no browser warnings. To achieve this, I’ve purchased my own domain and a wildcard TLS certificate.
To get started, you may wish to view my guide on Purchasing a Wildcard SSL/TLS Certificate. Once you have your Wildcard SSL/TLS Certificate, you can follow this guide.
If you haven’t yet set up your Pihole, you can follow this guide to set it up on a Synology NAS in a Docker Container or this guide to set it up on a Raspberry Pi.
Preparation
You will need the following:
- Administrator access to your Synology NAS. I’m using a Synology DS918+ running DSM 6.2.4-25556.
- Your Private Key from your Public/Private Key Pair. It should have the file extension of .key and when opened in a text editor, should look like the following:
-----BEGIN PRIVATE KEY-----
<base 64 encoded private key>
-----END PRIVATE KEY-----
- Your Certificate Signing Request. You may have generated this using OpenSSL. It contains details about your domain, your organisation, and also contains the Public Key from your Public/Private Key Pair. It should have a file extension of .csr and look like this:
-----BEGIN CERTIFICATE REQUEST-----
<base 64 encoded certificate request>
-----END CERTIFICATE REQUEST-----
- The Certificate Authority file. This should have a file extension of .ca and look like this:
-----BEGIN CERTIFICATE-----
<base 64 encoded certificate>
-----END CERTIFICATE-----
-----BEGIN CERTIFICATE-----
<base 64 encoded certificate>
-----END CERTIFICATE-----
Each of these files are in PEM format, which is just a Base64 encoded binary file so that they can be read as text files. Decoding these files will result in mainly non-printable characters. For more info have a read about Privacy-Enhanced Mail.
- Create a file called combined.pem. This file will contain your Private Key (.key) and your Certificate (.crt) in base64 (PEM format):
-----BEGIN PRIVATE KEY-----
<base 64 encoded private key>
-----END PRIVATE KEY-----
-----BEGIN CERTIFICATE-----
<base 64 encoded certificate>
-----END CERTIFICATE-----
Installation
Here is the guide to installing a custom TLS certificate on a Pihole from the official documentation which I followed when setting this up. Because this is running a docker container which blows everything away each time the container is rebuilt, we can map some files and directories from within the container to some shared folders on the Synology NAS for a persistent configuration.
- Edit your Pihole Docker container to map the files outlined in red below. In my case, I had a Shared Folder called Docker and all the Pihole files were inside ‘docker/pihole’.
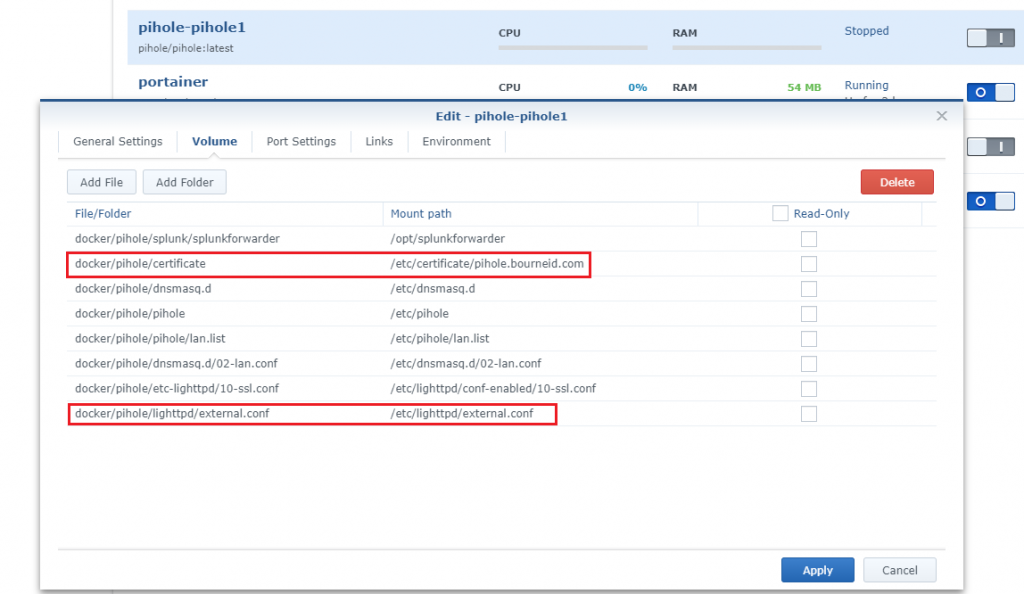
- In a directory on the container (/etc/certificate/pihole.bourneid.com in my case), place the combined.pem and fullchain.pem.
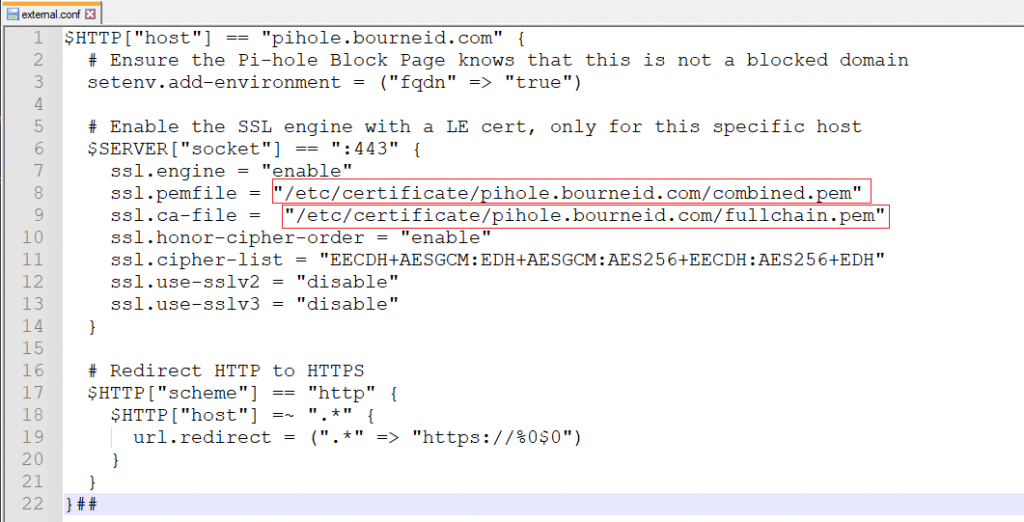
- Start the Pihole container, and then you should be able to browse to the Docker network share and see files from within that container in that share. You want to edit the external.conf file as per the Pihole documentation. Specify the absolute paths to the combined.pem and the fullchain.pem file:
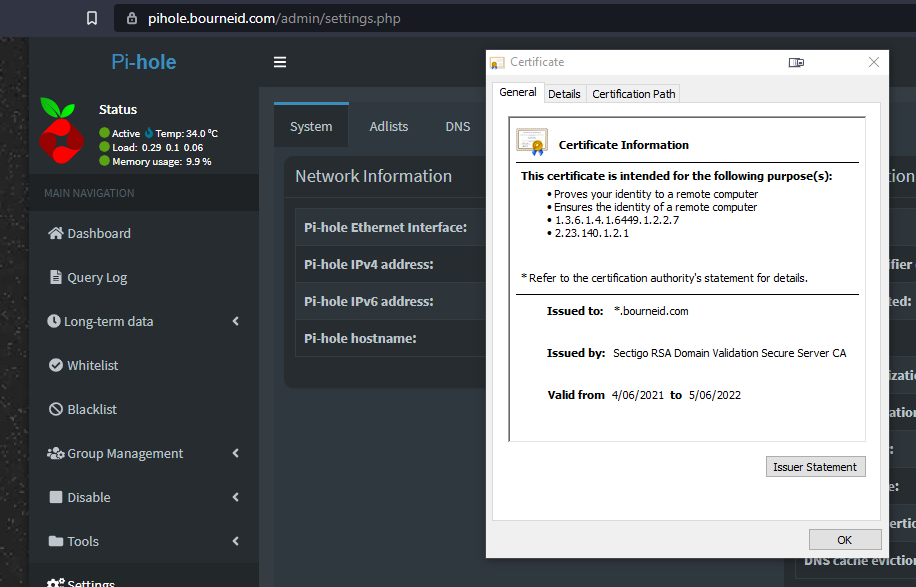
- Restart the Docker container and then browse to the web interface and check that it is using your certificate: